Blog posts

Python Development on M1 Macs

Apple Silicon Python Setup

I recently received a new MacBook Pro for work. Great! The only catch is that Apple discontinued their Intel-based line of MacBook Pros in 2021 and their new line of laptops use the Apple silicon M-series coprocessors. This might not seem like a problem at first, but the Apple silicon processors use ARM-architecture instead of Intel’s x86 architecture. For Python development, this is a potential problem because not all Python packages are installable for ARM architectures.

There is a possibly simple solution, in May 2022 Anaconda released a distribution supporting Apple silicon. However, a few years ago I chose to move away from using Anaconda to manage my Python virtual environments in favour of a more lightweight solution that I have more control over.

For years I have used the inbuilt venv module for creating virtual environments in combination with pyenv for installing multiple differnet versions of Python itself. With some help from this blog post I was able to combine pyenv with Rosetta2 (Apple’s x86 emulation tool that allows x86-compiled software to run on your Mac) to create a smooth setup to switch between different architecture versions of Python.

The steps to set this up are below.

Installing pyenv

Default ARM64 Installation

This section provides instructions on how to install Python using the default ARM64 architecture and pyenv. This will cover most of the use cases for developing in Python on macOS. Hopefully, in a few years this will be all that is required.

The best way to install pyenv is through Homebrew. This is recommended by pyenv and takes care of a lot of the additional shell environment setup. Installed with:

$ /bin/bash -c "$(curl -fsSL https://raw.githubusercontent.com/Homebrew/install/HEAD/install.sh)"

This defaults to install it in /opt/homebrew. If you are prompted to install Xcode Commandline tools, say yes. You can now install many tools using the brew command from Homebrew.

Setup the recommended build environment for pyenv:

$ brew install openssl readline sqlite3 xz zlib tcl-tk

Then install pyenv:

$ brew install pyenv

And finally, run to following to initialise your shell for pyenv every time you open it:

$ echo 'eval "$(pyenv init -)"' >> ~/.zshrc

Restart your terminal to enable the new .zshrc configuration.

Note: zsh has been the default login shell macOS since before the M1 chip was released, so I am assuming you are using zsh. If not, replace .zshrc with .bashrc whenever I mention it. Just be aware of potential differences in syntax.

You can then install a desired version of python (see list of possible versions with pyenv install --list), and set it as the global (default) python version. I am installing 3.10.9, but you can install whichever version you want:


$ pyenv install 3.10.9
$ pyenv global 3.10.9

You can verify that your python version is the one you just set and the platform architecture is using the inbuilt ARM architecture with:


$ python --version
Python 3.10.9
$ python -c "import platform; print(platform.machine())"
arm64

And you’re done! If all the packages you use are installable with arm64 architecture you can stop here, but if you run into this kind of error, read on…


$ pip install <package>
ERROR: Could not find a version that satisfies the requirement <package>
ERROR: No matching distribution found for <package>

x86 Installation with Rosetta2

This section provides instructions on how to install Python using the x86 architecture emulated by Rosetta2.

Commands can be run under emulated x86 architecture using Rosetta 2. Install it with:


$ softwareupdate --install-rosetta

You can run shell commands under x86 using the arch -x86_64 command:


$ uname -m
arm64
$ arch -x86_64 uname -m
x86_64

I will need to install an x86 version of Homebrew and pyenv. I had this permissions issue when installing this, so first fix this with (need sudo/admin permissions):


$ sudo chown -R $(whoami) /usr/local/share/zsh /usr/local/share/zsh/site-functions

Then install the x86 version of Homebrew. It is the same install command as above, but by using the Rosetta2 emulation Homebrew knows to install the x86 version:


$ arch -x86_64 /bin/bash -c "$(curl -fsSL https://raw.githubusercontent.com/Homebrew/install/HEAD/install.sh)"

This will install brew in /usr/local/bin/brew, for which you will need to configure your shell environment. Notice how the location of the brew executable changes from the default arm64 location, to the new x86 location:


$ which brew
/opt/homebrew/bin/brew
$ eval "$(arch --x86_64 /usr/local/bin/brew shellenv)"
$ which brew
/usr/local/bin/brew

Note: The command eval "$(arch --x86_64 /usr/local/bin/brew shellenv)" will need to be run every time you need to use the x86 version of Homebrew to install. More on this later.

Now, you can install pyenv using the x86 version of Homebrew, don’t forget to still set up the recommended build environment for pyenv:


$ arch --x86_64 brew install openssl readline sqlite3 xz zlib tcl-tk
$ arch --x86_64 brew install pyenv

You now have all the tools to install multiple versions of Python in different architectures! However there are some teething problems and clunky user-experience that still needs to be set up before we do so.

Set up a smooth user experience

Easily switch architectures

Set up some useful aliases by adding the following to your .zshrc:


# Alias for switching terminal architecture
alias x86='arch -x86_64 zsh --login'
alias arm64='arch -arm64 zsh --login'

# Edit prompt name so you know the current architecture
PROMPT="$(uname -m) $PROMPT"

Restart your shell, you should now see arm64 at the front of your prompt, and it will change if you use the newly-created x86 alias to switch architecture:


arm64 $ uname -m
arm64
arm64 $ x86
x86_64 $ uname -m
x86_64

You can return to the ARM64 shell with exit or with the arm64 alias.

Python version name suffix

One limitation of using pyenv to install different architecture versions of python is that it doesn’t allow you to give your different python versions custom names. So if I want to now install an x86 version of Python 3.10.9 (the same as above), I cannot do so without overwriting the ARM64 installation:


arm64 $ arch -x86_64 pyenv install 3.10.9
pyenv: /Users/adalessa/.pyenv/versions/3.10.9 already exists
continue with installation? (y/N) N

To solve this issue, I adapted the broken pyenv-alias plugin to create pyenv-suffix, which allows you specify a suffix to append to the version name of a pyenv-installed version of Python.

Install it with:


$ git clone https://github.com/AdrianDAlessandro/pyenv-suffix.git $(pyenv root)/plugins/pyenv-suffix

Now, if you set the PYENV_VERSION_SUFFIX environment variable, it will be appended to any version you install with pyenv.

Shell configuration

The last thing that needs to be fixed is ensuring that the shell is configured correctly for the architecture you are using. Add the following to your .zshrc and open a new terminal:


# Alias for x86 version of Homebrew and pyenv
if [ $(uname -m) = "x86_64" ]; then
eval "$(arch --x86_64 /usr/local/bin/brew shellenv)"
alias pyenv='PYENV_VERSION_SUFFIX="x86" /usr/local/bin/pyenv'
fi

This will mean everytime you open a new x86 terminal, the Homebrew shell environment will be configured, and the PYENV_VERSION_SUFFIX envirtonment variable will be set. This should mean seemless installation of anything with Homebrew and pyenv.

Install an x86 version of Python!

This is as simple as entering an x86 shell with the x86 alias and installing the desired Python version. First, check what versions of Python you have installed, it should look something like this:


arm64 $ pyenv versions
system
* 3.10.9 (set by /Users/<username>/.pyenv/version)

Then, enter the x86 shell and install the desired version:


arm64 $ x86
x86_64 $ pyenv install 3.10.9
pyenv: /Users/adalessa/.pyenv/versions/3.10.9 already exists
continue with installation? (y/N) y
Installing at /Users/adalessa/.pyenv/versions/3.10.9x86
python-build: use openssl from homebrew
python-build: use readline from homebrew
Downloading Python-3.10.9.tar.xz...
-> https://www.python.org/ftp/python/3.10.9/Python-3.10.9.tar.xz
Installing Python-3.10.9...
python-build: use readline from homebrew
python-build: use zlib from xcode sdk
Installed Python-3.10.9 to /Users/adalessa/.pyenv/versions/3.10.9x86

Now you should see the new version installed with the “x86” suffix appended (note I have exited the x86 shell, but it doesn’t matter):


arm64 $ pyenv versions
system
* 3.10.9 (set by /Users/<username>/.pyenv/version)
3.10.9x86

How do you use it? There are three ways described in the pyenv GitHub Page. The simplest of which is the pyenv shell command:


arm64 $ python -c "import platform; print(platform.machine())"
arm64
arm64 $ pyenv shell 3.10.9x86
arm64 $ python -c "import platform; print(platform.machine())"
x86_64

Although my preferred method is to set the local version of python on a per-project basis. This is so that the python version automatically changes when you enter a project directory, and also because using pyenv shell persists until you restart your shell.

Open a new terminal. Enter your project directory and set the local version:


arm64 $ cd my_project
arm64 $ python -c "import platform; print(platform.machine())"
arm64
arm64 $ pyenv local 3.10.9x86
arm64 $ python -c "import platform; print(platform.machine())"
x86_64

You will now see a .python-version file added to your directory and that version of Python will be used whenever you are in that directory!

Highlights from RSECon22 from the central RSE team

By the whole RSE Team

Overview

This year, the annual conference organised by the Society of Research Software Engineering was back on as an in-person event for the first time since 2019. This meant that for many of the college’s central RSE team it was their first opportunity to meet up with RSEs from across the country and further afield. The College was well represented, with five delegates attending from the central team along with RSEs based in specific departments, research groups and teaching staff from the Graduate School.

Overall, the conference was an excellent opportunity to strengthen old connections and make new ones, with plenty of opportunities for networking. The mix of talks, posters, panel discussions, tutorials and walkthroughs covered a wide range of topics from the highly technical to more community-focused issues. Although it is impossible to cover the whole event in detail, we have summarised some of our personal highlights below. The full set of recorded presentations should be available on the SocRSE Youtube channel soon.

(more…)

Fine Tuning Django User Permissions

Fine Tuning Django User Permissions

Dr Dan Davies from the Imperial RSE team has written a how-to guide based on his experiences with the Django web framework for python. Read the full blog post here.

The RSE team is involved in an increasing number of software projects requiring a front-end web app. The main advantage to having a web app element for your research software is that users can interact with it via a web browser, without having to install anything to their local machine. There are of course downsides, including the need to deploy, host and maintain software somewhere suitable. However, there is a wide range of popular frameworks to make the whole process a lot smoother.

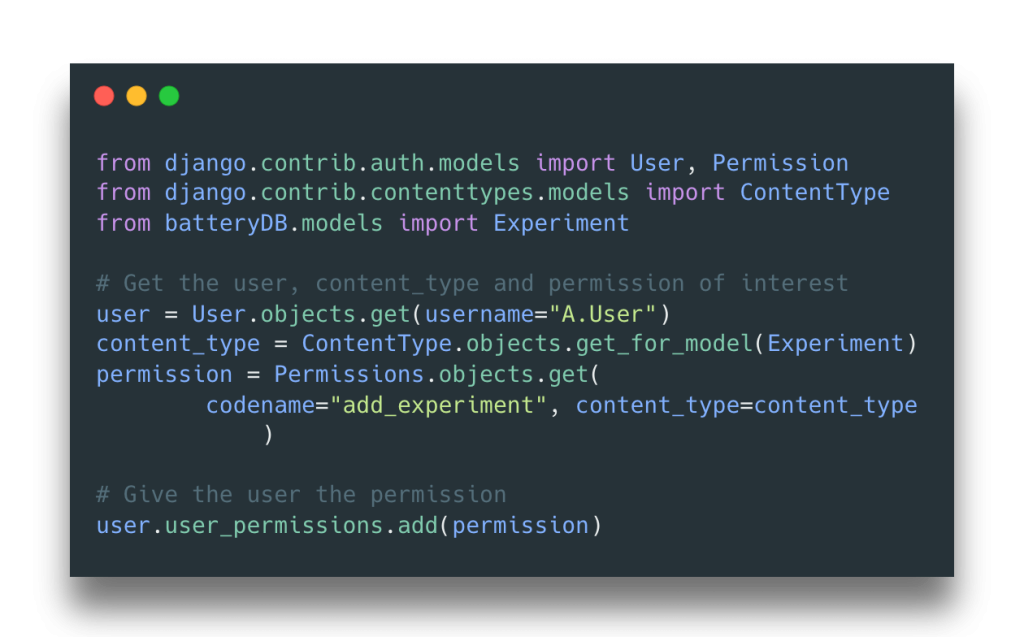
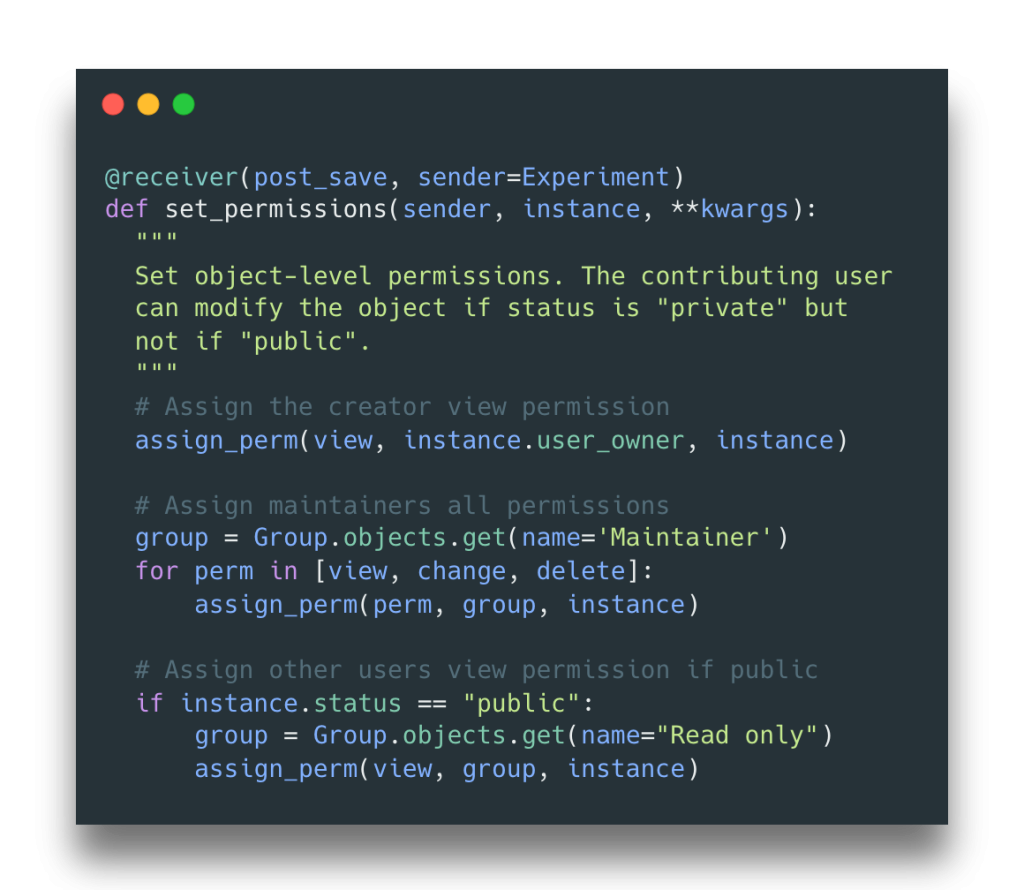
User permissions are an important consideration for any web app. This is not necessarily just to do with overall security, but how you might want different types of users – with different roles – to interact with your software. For example, it is common to require admin users to be able to perform a wide variety of actions, while the majority of users should only be able to perform a small subset of actions. The degree of complexity required will depend on the overall aim.

We frequently use the Django web framework, which facilitates the creation of web apps solely in Python. This blog post covers aspects of user management and permissions within Django, which Dan has learned about and implemented while working on a web-based database to store and visualise sets of experimental data. It covers some basics such as how to assign permissions to user and groups of users, as well as more advanced topics such as setting up automatic permissions when specific objects are created. We hope it will be useful to the wider RSE community and beyond!

Simple permission assignment in Django
Fig. 1: Simple permission assignment in Django
Automatic permission assignment for specific objects in Django.
Fig. 2: Automatic permission assignment for specific objects in Django.

Building Research Software Communities

Building Research Software Communities: Running a workshop on community building and sustainability for the research software community

Michelle Barker, Jeremy Cohen, Daniel Nüst, Toby Hodges, Serah Njambi Rono, Lou Woodley

On Wednesday 17th March 2021, around 50 individuals from a wide range of different countries and time zones came together for the first of two 2-hour sessions that formed our “Building Research Software Communities: How to increase engagement in your community” workshop.

Run as part of the SORSE Series of Online Research Software Events, this workshop brought together an organising team consisting of 3 members of the international research software community and a group of speakers including experts in community engagement and sustainability. In this blog post we provide an overview of the workshop and some of the key messages and outcomes.

(more…)

Research Software Directories

This is a summary of a SORSE discussion session, presented by:

  • Mark Woodbridge, Imperial College London
  • Vanessa Sochat, Stanford University
  • Jurriaan Spaaks, Netherlands eScience Center

And featuring contributions from:

  • Malin Sandström, INCF
  • Alexander Struck, Humboldt University of Berlin

Introduction

The discussion session “Research Software Directories: What, Why, and How?” was held on September 16 during SORSE, an International Series of Online Research Software Events. As presenters, we each shared efforts to develop and maintain software directories: catalogues to showcase the software outputs of an institution or community. The directories presented were:

Each of the above offered several advantages and disadvantages, or were scoped for particular use cases. For example, research-software.nl provides a robust application for serving detailed metrics and metadata for software, however it requires more manual entry. The Research Software Encyclopedia is automated and does not require hosting, but it lacks the same level of metadata. The Imperial College London and GitHub Search research software directories offer much quicker to deploy solutions, but might be too simple for some use cases. The directories are discussed in detail in the following sections. In addition to this set, we suggest the reader take a look at the Awesome Registries list to find additional examples.

(more…)

Remote working for researchers and developers

This post was compiled by Mark Woodbridge, Jeremy Cohen and Tony Yang of Imperial College’s Research Software Community.

As COVID-19 drives us into uncharted territory, many of us at Imperial will be having our first ever experience of working off-campus for an extended period of time. It, of course, depends on our role, but many members of the College community will be no stranger to mobile working – pitching up at one of the many campus cafes, breakout spaces or a coffee shop, getting out our laptop or mobile device and switching very quickly into a state of focused work. Maybe finishing those next couple of paragraphs of a paper or report, fixing that annoying bug in our scientific code that someone just reported, or responding to an urgent technical query from a collaborator. Sometimes a change of space or environment provides just that little shift in perspective that you need to help solve that challenging technical problem, or get the right wording for that difficult section of the paper, much more quickly than if you’d sat in your office staring at your screen for hours!

(more…)

Running Jupyter notebooks on Imperial College’s compute cluster

We were really glad to see James Howard (NHLI, Faculty of Medicine) announcing on Twitter that he’d published a Kaggle kernel to accompany his recent publication on MR image analysis for cardiac pacemaker identification using neural networks via PyTorch and torchvision. Sharing code in this way is a great way to promote open research, enable reproducibility and encourage re-use.

Figure 3 from Cardiac Rhythm Device Identification Using Neural Networks

We thought it might be helpful to explain how to run similar notebooks on Imperial’s cluster compute service, given that it can provide some benefits while you’re developing code:

  • Your code and data remain securely on-premise, thanks to the RCS Jupyter Service and Research Data Store
  • You can run parallel interactive and non-interactive jobs that span several days, across multiple GPUs

With James’ permission we’ve lightly modified his notebook and published it in an exemplar repository alongside some instructions to run it on the compute cluster. We hope this can help others to use a combination of Conda, Jupyter and PBS in order to conduct GPU-accelerated machine learning on infrastructure managed by the College’s Research Computing Service – without incurring any cost at the point of use.

Many thanks to James Howard for sharing his notebook and reviewing our instructions

RSLondonSouthEast 2020

RSLondonSouthEast 2020, the annual gathering for Research Software Engineers based in or around London, took place on the 6th February at the Royal Society. The College was strongly represented by contributions from RSEs based at Imperial.

Full talks:

Lightning talks:

Posters:

Jeremy Cohen introduces RSLondonSouthEast 2020 at the Royal Society

Jeremy Cohen (Department of Computing) was the chair of the organising committee. Stefano Galvan (Department of Mechanical Engineering), Alex Hill (Department of Infectious Disease Epidemiology) and Jazz Mack Smith (Department of Metabolism, Digestion and Reproduction) served on the programme committee.

Many thanks to all the committee members and everyone who presented, submitted proposals or attended on the day, and to EPSRC and the Society of Research Software Engineering for their support. For more information from the event check Jeremy’s full report, RESIDE’s blog post or #RSLondonSE2020 on Twitter.

Quilting with Julia, or how to combine parallelism and derived types for high performance computing

Research and quilting have a similar Zen in that both combine and build upon multiple prior works. But the workflow is difficult to reproduce in research software: how can we combine group X’s state-of-the-art ODE solver with group Z’s state-of-the-art parallel linear algebra to create Y’s new biology model when they all use different libraries and conventions? This is the problem that Julia tackles head on, thanks to it’s innovative type system and multiple dispatch. In “Shared Memory Parallelization of Banded Block-Banded Matrices” we describe how to combine the parallelization capabilities from one package (SharedArrays) with the specialized matrix  of another (BlockBandedMatrices.jl) – without modifying the internals of either.

This work follows on from a NumFOCUS sponsored collaboration at Imperial College between the Research Computing Service and Sheehan Olver in the Department of Mathematics.

A review of the RSE team’s activities in 2019

2019 has been another very busy and productive year for the RSE team in the Research Computing Service at Imperial College. Our core mission is to accelerate the research conducted at Imperial through collaborative software development, and we have now completed 24 projects since our inception 2 years ago with 75% of our first-year projects resulting in follow-on engagements. We’ve highlighted 5 of our most fruitful collaborations on our new webpages, which also provide more information about the team and the services we offer. We are about to appoint our fifth team member, reflecting the value we’ve offered to research projects (and proving that there is a career pathway for RSEs!).

In addition to our project work we’ve assisted researchers at over 40 RCS clinics this year and played a strong supporting role in Imperial’s Research Software community, from Hacktoberfest to departmental events. We’ve developed two brand new Graduate School courses in Research Software Engineering (to be delivered next term) and have helped deliver 4 Software Carpentry workshops. We’ve also played an increasingly active role in promoting the benefits of RSE (and the role itself) to relevant stakeholders in the College. This has complemented our broader engagement activities: acting as expert reviewers for JOSS submissions, contributing to numerous OSS projects, presenting at 3 international RSE conferences (deRSE19, UKRSE19 and NL-RSE19), and promoting our work via blogging, social media and attendance at several other relevant events – locally (e.g. RSLondonSouthEast 2019) and nationally (e.g. CW19, CIUK).

RSE19 conference photograph
The team (amongst amongst many other RSEs!) at UKRSE19. Photo courtesy @RSEConUK.

We continue to develop tools and infrastructure to support RSE within in the College. The nascent Research Software Directory aims to showcase the breadth of software developed at Imperial, encouraging collaboration, re-use and citation. We’re also attempting to give software a stronger position amongst research outputs through our current work on the Research References Tracking Tool (R2T2) and helping researchers submit their software to Spiral via Symplectic. Finally, we continue to share advice and guidance on how to adopt better RSE practices, such as QA and CI.

As we look forward and further develop the Research Computing Service’s RSE capacity and expertise we’d like to thank all the academics who have trusted us with their projects, and all the researchers who’ve taken the time to explain their work and have enthusiastically embraced good software engineering practices. We’re looking forward to another 12 months of strengthening RSE at Imperial!