Month: February 2022

Really Simple Syndication (RSS)

What is RSS

Really Simple Syndication (RSS) provides a quick way to read the latest updates from your favorite websites.

Many websites offer direct RSS feeds. When a new article is published the RSS feed updates and you can be notified to the new article(s)

If you want to get into more of the nitty gritty and techie know how about RSS then there are some good articles published on WIkipedia (https://en.wikipedia.org/wiki/RSS) and Lifewire (https://www.lifewire.com/what-is-an-rss-feed-4684568)


Why use RSS

RSS is effectively a way to keep tabs on a website or blog page and check for new content without having to continuously visit the page to check for new content. Your RSS feed becomes the “push notification” for new content.


What is the RSS for this blog?

The RSS feed for this blog is http://feeds.feedburner.com/Office365NewsAndUpdates


How can I “consume” RSS feeds?

There are a number of ways to consume the content or get updates about new content on the blog.

You can use the Outlook desktop client to read RSS feeds, or you can deliver the RSS feed into the posts tab of a teams channel, or you can use your own preferred RSS reader.


Outlook to read RSS feeds

You can configure Outlook to digest RSS feeds and deliver the summary and link to your Outlook client.
See https://support.microsoft.com/en-us/office/subscribe-to-an-rss-feed-73c6e717-7815-4594-98e5-81fa369e951c


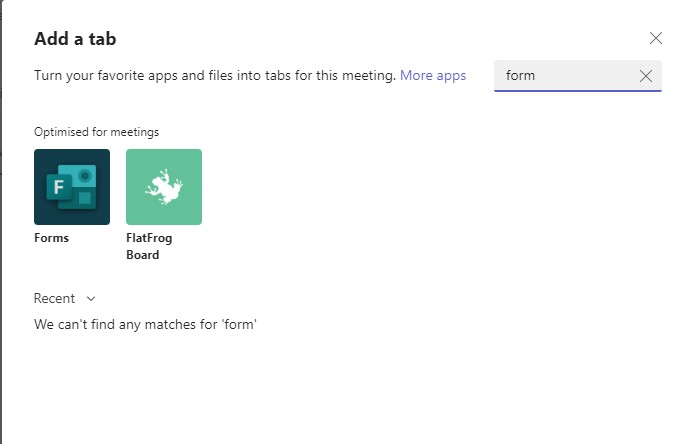
Using Teams to consume RSS feeds as posts in a Channel

        1. Select the channel where you want the RSS feed to post – you might want a seperate channel for each feed depending on the number and fequency of updates.
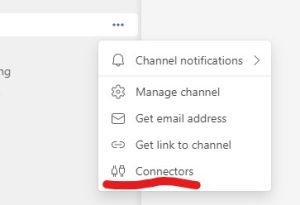
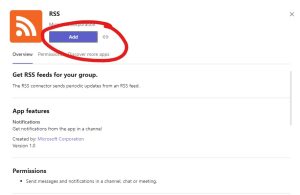
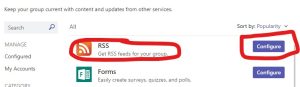
        2. Click on the three dots and choose ConnectorsScreenshot showing how to get to connections in Teams
        3. Choose the RSS connector and click “Add”Screenshot showing how to add RSS as a connector   Screenshot showing adding RSS as a connector
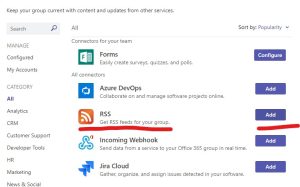
        4. Then click on three dots beside channel name and choose connector and then configure the RSS feed – give the connector a name (such as Imperisl Office 365 Blog) and enter the rss feed as above (http://feeds.feedburner.com/Office365NewsAndUpdates) and choose the frequency of updates.SCreenshot showing how to get into RSS connector configurationScreenshot showing the details for configuring the Office 365 blog RSS feed
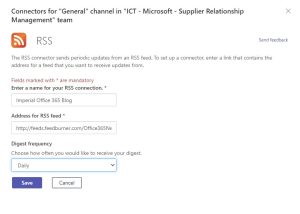
        5. For this blog you’ll probably only want to check once a day.
        6. Click save
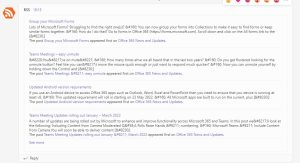
        7. The RSS feed set up will be shown in the posts tab of your channel along with a post from the RSS connector with recent posts.Screenshot showing what the RSS posts look like in Teams

Using a different RSS feed reader

There are numerous RSS readers available. You can find out about the top ten RSS readers here.  The page gives details on pricing and which operating systems / use modes are supported.

Set up your RSS reader according to the general instructions for your software of choice, then add the feed using the dedicated feed for this blog (http://feeds.feedburner.com/Office365NewsAndUpdates)


Teams Meeting Co-Organisers

Scheduling meetings for others? Want to give someone else control of the meeting?


Set up Co-Organisers to control the meeting and lobby even if you can’t attend.


How?

  1. Schedule your meeting as normal.  Ensure that you have invited at least your proposed co-organiser (must be inside the organisation) and any presenters.
  2. Go to Meeting Options
  3. Look for the co-organiser setting and click on the drop down arrow to select the co-organiser.

    Screenshot of meeting options for selecting co-organiser

  4. Save your meeting options.


When will this be available?

Microsoft have started to roll this out and expect it to be fully available by the end of March 2022.

Group your Microsoft Forms

Lots of Microsoft Forms?  Struggling to find the right one(s)?


You can now group your forms into Collections to make it easy to find forms or keep similar forms together.


How do I do that?

  1. Go to forms in Office 365 (https://forms.microsoft.com).
  2. Scroll down and click on the All forms link to the bottom right of the screen …
  3. In the top right click on the “New Collection” link …Screenshot showing the "new collection" link in Forms.
  4. Name your collection
  5. To assign a form to a collection click on the three dots on the form and choose “move to collection” and then the collection that you wish to usescreenshot showing move to collection in Microsoft Forms
  6. Once you have added forms to a collection you will see your collection in the forms pages and can drill into a collection to use the forms like normal.  You can also create new forms in a collection directly.Screenshot of a forms collection


Teams Meetings – easy unmute

“You’re on mute” 


How many times ahve we all heard that in the last two years?


Do you get flustered looking for the unmute button?  Feel like you can’t move the mouse quick enough or just want to respond much quicker?


Now you can unmute yourself by holding down the Control and Spacebar keys (Option and spacebar on a Mac) while you talk, then release to mute yourself again.


This feature is available NOW in Teams desktop only.

Updated Android version requirements

If you use an Android device to access Office 365 apps such as Outlook, Word, Excel and PowerPoint then you need to ensure that you device is running at least v8.


This updated requirement will roll in starting on 23 May 2022.


All Microsoft apps are built to run on the current, plus two previous major releases of operating systems and this applies across Android, iOS, Mac OS and Windows.


Keeping your device operating system up to date will ensure continued usability and also ensure security and the availability of recent features.


Love your device – update it and keep it secure!


You can find the latest on all the requirements for devices and versions that are supported on Microsoft’s pages here.


Teams Meeting Updates rolling out January – March 2022

A number of updates are being rolled out by Microsoft to enhance and improve functionality across Microsoft 365 and Teams.

In this post we’ll look at the following:

  • Including Content from Camera
  • Moderated Q&A
  • Polls
  • Raise Hands – numbering.


Microsoft Teams – Include Content from Camera

You will soon be able to deliver content from a second camera attached to the device that is joined to a meeting – so if, for example, you want to share a diagram or view of a specimen while giving a lecture or seminar, it will be possible to share content from a camera.  To do this go to the share option in the Teams meeting and choose “Content from Camera”.

Screenshot shoing the Share menu and highlighting the content from caemra option


Moderated Q and A in Teams meetings

You can now add a Q and A app to your meeting to provide a moderated Q and A experience, like that provided in Live Events.  By using this Q and A app you can control and moderate or vet questions before making them publicly visible to the whole audience.  All those with the presenter role in the meeting have the ability to moderate questions.  This feature only works in direct invite meetings at the present time and not in channel meetings.


To add the Q and A app to your meeting, go to the calendar in Teams and fin the meeting entry before it starts.  Click on the +

Screenshot shoing how to add an app to a teams meeting


Then enter q in the search box or find the Q&A app in the list of apps …


Screenshot showing how to find hte Q&A app


Select the Q&A app and choose Add …


Screenshot showing how to add the Q&A app


Select the option for moderated questions (NOTE that you cannot turn this off later – once it is on it stays on for the meeting) then click save …


Screenshot shoing how to moderate the Q&A function


The app then adds an additional “tab” to your meeting from where you can see the questions including htose which have been published and dismissed.  You can also change some settings to stop further questions – this may be useful after your meeting finishes.


Screenshot showing the Q&A app within the team meeting


Adding Polls to Team Meetings

You can now use Forms to add Polling options to Teams meetings.  For channel based meetings this only delivers basic multiple choice polls, but for direct invite teams meetings you can deliver multiple choice polls, quizes and word cloud polls.

  • A Poll is just a question and a series of answers (where there may be a single choice or multiple answer option).
  • Quizzes – like a poll but you can set an option as the correct answer – great for offering self marking polls to assess progress in a lecture or course.
  • Word Cloud polls – us a text entry answer and then deliver the words as a word cloud with the most popular answers creating larger words in the resulting cloud.

To add a poll do the following:

Click the + sign in your teams meeting entry (just like above).  Then search for and choose Forms (may also appear as Polls soon!)

Screenshot showing how to add polls to a teams meeting


Then click on Save to add the forms app to the meeting.


Screenshot showing how to save polls as an app into Teams meetings


Once added you can choose to create a new poll …


Screenshot showing how to create new poll


Then choose your poll type …


Screenshot showing choice of poll type


Create your poll and add additional options as needed.  Remember to set the anonymity options and results options as you need.


Screenshot showing how to create a poll question with multiple answers


Once saved as a draft, you can choose to Launch the poll into your meeting, edit it further or delete it.


Screenshot shoing how to launch, edit or delete a poll


Once you have launched a poll you will be able to close it so no more responses are collected, see the results or delete it.


Raise Hands – what order did they go up?


In large meetings with lots of hand raising it can be difficult to work out who is next to speak or have input to the meeting.  Now when your meeting colleagues use the “Raise your hand” feature Teams will provide a visual indication of the order in which the attendees raised their hands, allowing you to ensure that you don’t miss people out when it is their turn!


Raise hands - numbered view

OneDrive for Mac OS – Big Changes Happening NOW – February 2022

What is happening and why?


Apple is changing the technology that they use within their operating systems and as such Microsoft, along with all other cloud storage providers have to update their sync clients.

This means that the OneDrive sync client is going to change for Apple users, and has already started to for some.

For a while it means that there will be multiple versions in use depending on the version of the Apple OS that you are using.

ICT encourages you to update to the latest ICT supported version for your hardware at your earliest convenience to ensure that your system remains up to date with security and functionality patches and fixes.

The main change that you will see comes to the feature known as “files on demand”.

This is NOT a new feature, but the implementation and use is changing.


Who is affected?


Initially the changes apply to those with macOS 12 (Monterey).  If you use macOS 11 (Big Sur) or earlier then this doesn’t affect you.


The current version of Monterey (v12.2) is the last that will support the old technology.  The new Files on Demand feature is available for all versions of Monterey from 12.1 upwards.


What happens?


When you update your macOS to v12.2 or 12.3 your OneDrive sync client will also be updated automatically.


You will no longer be able to choose whether to turn on Files on Demand – it is mandated and will be on from the point of upgrade.  There is NO option to turn off Files on Demand.


How does Files on Demand work?


Instead of downloading the whole content of your OneDrive onto the local hard drive, or having to choose which folders and files you sync locally, the client creates what are called Symlinks.  Essentially these are like bookmarks or empty entries for the files and folders.


When you browse your local version of OneDrive the files and folders appear to reside ont he local disk, but in fact they are just pointers to the cloud stored versions.


When you open a file the OneDrive sync client kicks in and in the background it downloads a local copy.  Then it looks for changes to the file and sycns those changes as they happen.


This optimises disk space and is very useful for those with smaller storage devices – Solid State Drives (SSDs) are typically 1/4 of the size of traditional spinning disks but are used widely because they are much faster and provide much better performance and long term stability.


In Finder you will have the option to select a file or folder and then “Always Keep on this Device” or “Free up Space”.


  • If you choose to “Always Keep on this Device” then a copy will be stored locally and synced between the cloud storage space and your local drive.


  • If you have a local copy but need to free up space then choose the “Free up Space” option to return a file or folder to just being stored on the cloud and release back the local storage on the machine that you are using.

Screenshot of new OneDrive syunc client and notification of changes


What to do next?


If you are thinking about upgrading your Mac then use the following as a set of sensible precautions.

  • Update to macOS v12.3 at some idle or downtime. Don’t do it in the middle of an important job, just in case there’s a problem.
  • Update with a stable Internet connection.
  • Ideally do the macOS update at the end of the day and leave your Mac on overnight to give OneDrive a chance to update all the files and settings.
  • Backup before switching. Happily there’s already one or two backups in place.
    • OneDrive saves all deleted and changed files for 30 days.
    • Apple TimeMachine, if enabled, also has a copy of current and past files.
    • If you wanted to be very sure, make a separate copy of all your files, especially those in OneDrive storage.


Conclusion


Before you go complaining about Microsoft, this change is being forced on Microsoft and other cloud storage providers by Apple.

If you want more details then Microsoft have written a blog post about this and include answers to many questions.  I’m not going to duplicate what they have done elsewhere!