One Drive for Business (ODfB) is the personal storage area assigned to each user as part of their Office 365 license.
One Drive for Business is delivered as a “personal SharePoint site”. You get all the great SharePoint features such as collaboration and co-authoring if you choose to share a file (see below for some guidance), but it is a personal site.
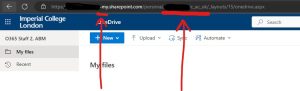
If you look at the address for your One Drive for Business, you’ll see that it has “-my” after the tenant name but that it sits on SharePoint, and the address also contains your User Principle Name (but with the @ and . characters replaced with _).
Quota
Within Imperial College London, every user gets an initial quota of 5 Terra Bytes (5TB) of storage space. If you manage to fill that (and there’s no competition to try!), then we can extend your quota further should you need it. We can only do that once your One Drive for Business is consistently using more than 90% (4.5TB) of the quota.
OK – so how much is 5TB really?
85,000 CD quality MP3 tracks – roughly equivalent to 1,000,000 hours of listening, which is about 114 years of back to back listening.
or
1.5 million photos
or
2,500 DVD quality movies
File Versioning
OneDrive for Business and SharePoint both support automatic file versioning. So you don’t have to add version numbers onto documents any more, nor do you have to remember where you are up to.
When you open a file from your ODfB the default is to open the current version.
You can see all the versions of a file by clicking on the vertical dots to the right of the file name (when you hover over the file in the browser) and then choosing Version History.
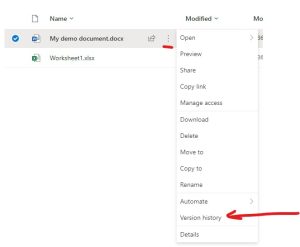
Screenshot showing how to access version history.
Once you have the version history open you can choose to delete a version or restore an earlier version. Alternatively you can open a version so that you can compare it against the current version.
Note – you can only Open the current version (you can’t restore it because it is the most up to date version and you can’t delete the current version).
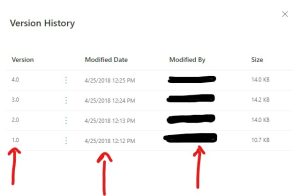
Screenshot showing version history for a file.
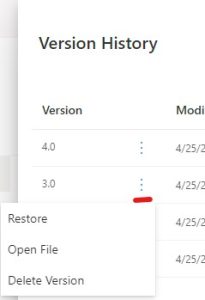
Screenshot showing actions that can be carried out on a version of a file.
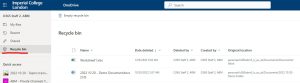
Recycle Bin
You can delete a file or version of a file and then restore it for yourself.
This works for 90 days, after which you will need to ask ICT for assistance, up to 180 days.
If you deleted it more than 180 days ago, then it’s gone for good.
Use the Recycle Bin link in the navigation bar on the left side of your ODfB to see the files and folders that you deleted.
How to access the Recycle Bin in One Drive for Business.
Select a file or version of a file to then be able to restore the file.
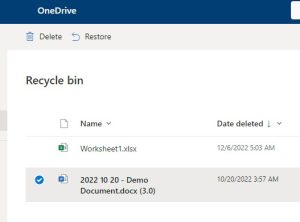
Screenshot showing how to restore a file or file version from the recycle bin
Sharing
Do NOT share files with large numbers of people or for long term sharing. Use a SharePoint site for long term group access or sharing.
Sharing from your One Drive for Business is designed for short-term, small-scale collaboration. It is NOT designed for you to deliver long term access or to run a group or department file share.
N.B. If you have shared files and are leaving College then you need to give those files to someone else – when you leave College your license to access Microsoft 365 will be revoked and your personal One Drive for Business data will be deleted automatically.
Imperial College London do NOT allow “anyone” sharing. Anonymous links are dangerous and can lead to serious GDPR data breaches.
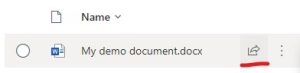
Screenshot showing how to start sharing wizard

The sharing controls
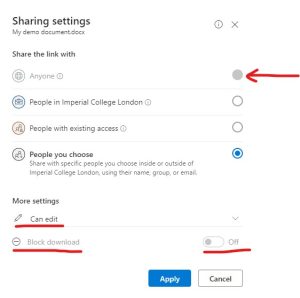
Advanced sharing controls
You can share directly with people, either by selecting them from the internal directory, or with external people by entering their email address or institution UPN.
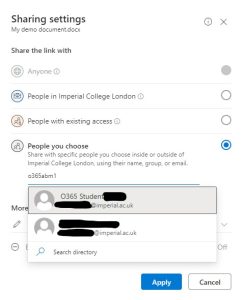
Screenshot showing how to add people to sharing
When you choose to share you can control what level of access is provided (Edit, Review or Read).
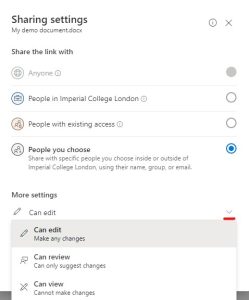
Sharing access levels
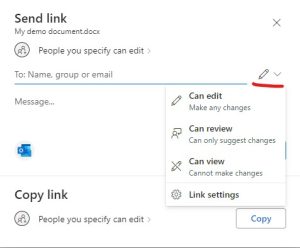
Sharing access levels
You can also see what you have shared by using the Shared link in the left navigation bar in ODfB. You can then choose between the files that have been “Shared with you” (i.e. shared by others for you to read, review or edit) or “Shared by you” (your files which you have shared).
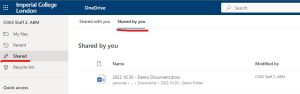
Screenshot showing shared files
You can control the access at any time. Select the file or folder and then click on the menu and choose “manage access”. You can stop all access by clicking on the “Stop sharing” option at the top, or you can change the access for individuals who no longer need access.
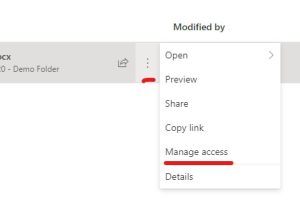
Access to manage access
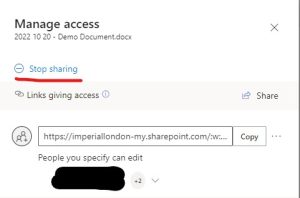
Managing access
What’s a UPN?
Your UPN is your User Principle Name. At imperial we use username followed by the domain (which means it is different from our primary email address). Other institutions may well also have a UPN which is different to the primary email address.
If you are sharing with others then ask them if they have a Microsoft 365 UPN (i.e. do they login with something other than their primary email address).
UPNs are also used when adding people to Microsoft 365 groups to ensure that the user is correctly authenticated and access is granted appropriately.
If you are being added to a group (Team or email group) at another institution, make sure that you have given them your UPN for seamless access.