A number of new features and updates have been announced affecting several Microsoft 365 apps and services.
Viva Insights
Viva Insights brings you a daily email briefing before you start your day, helping to ensure that you have the right information in advance of your meetings and reminders which are pertinent to you. The Viva Insight briefing email is personal to you and cannot be seen by anyone else.
In January 2023, Microsoft will be pausing the briefing emails while they implement improvements and additional personalisation. The current update states that briefings should return at the end of February following the “make over”.
During the period when there are no emails, you can still view your personal insights by using the Outlook add-in or adding the Viva Insights app to Microsoft Teams.
Microsoft Teams Updates
Everyone Mention
Commencing in late January 2023, a new feature will roll out allowing Teams users to mention everyone in a group chat or meeting chat in one simple way. Currently you can @ mention each person individually, which is fine in a small group chat or meeting chat, but if you have a large meeting chat or group chat running and want to alert everyone there is currently no simple way to do this.
Once the new feature is live you will be able to type @everyone and then everyone in the chat will receive a notification just like they do when they are individually @ mentioned at the moment.
Breakout Rooms
From late December ’22 or early January ’23 depending on roll out, Teams Breakout Rooms will support co-organiser management. So if you create a meeting and set a “co organiser” on the meeting then the co-organiser will have full management rights over Breakout Rooms.
More Reactions in Teams
A greatly expanded set of reactions are currently rolling out in Teams for use in Chat and Team conversations. The reactions for meetings remain limited for simplicity, but for chat and threaded conversations there are now over 800 “emojis” to choose from. These are available from December 2022.
Multi Factor Authentication Improvements
Commencing at the end of February 2023, Microsoft will begin roll out of enhanced Multi Factor Authentication replacing the push notifications with number matching. Many organisations are seeing an increase in attacks due to MFA fatigue due to users just hitting approve without thinking about what they are approving.
Number matching requires the up to date Microsoft Authenticator app to be installed from either the iOS App store or Google Play store fro Android devices. If you have been approving MFA requests via an Apple watch then you should uninstall the apple watch app and approve all authentication requests via the phone – the watch app does NOT support number matching.
Number matching works by displaying a number following successful username and password verification. The authenticator app will then provide information on what app is being accessed and the location of the access request (including a map display) and require the user to enter the number as displayed on the login screen of the app.
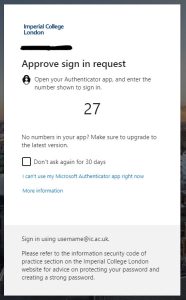
Number matching display during login
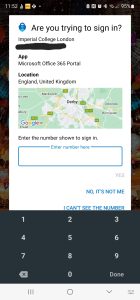
Number matching on Authenticator App