Blog posts

Teams Meeting Updates rolling out January – March 2022

A number of updates are being rolled out by Microsoft to enhance and improve functionality across Microsoft 365 and Teams.

In this post we’ll look at the following:

  • Including Content from Camera
  • Moderated Q&A
  • Polls
  • Raise Hands – numbering.


Microsoft Teams – Include Content from Camera

You will soon be able to deliver content from a second camera attached to the device that is joined to a meeting – so if, for example, you want to share a diagram or view of a specimen while giving a lecture or seminar, it will be possible to share content from a camera.  To do this go to the share option in the Teams meeting and choose “Content from Camera”.
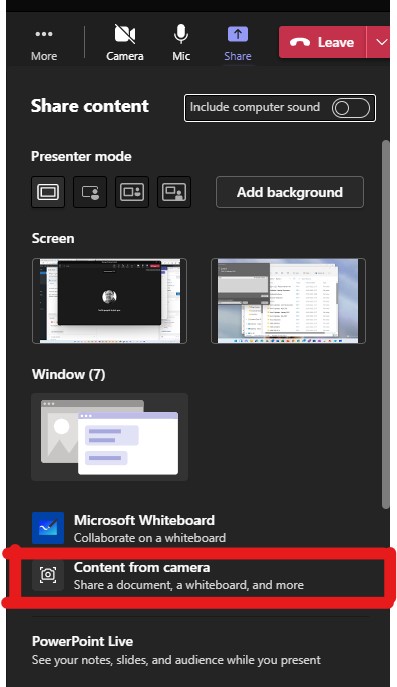
Screenshot shoing the Share menu and highlighting the content from caemra option


Moderated Q and A in Teams meetings

You can now add a Q and A app to your meeting to provide a moderated Q and A experience, like that provided in Live Events.  By using this Q and A app you can control and moderate or vet questions before making them publicly visible to the whole audience.  All those with the presenter role in the meeting have the ability to moderate questions.  This feature only works in direct invite meetings at the present time and not in channel meetings.


To add the Q and A app to your meeting, go to the calendar in Teams and fin the meeting entry before it starts.  Click on the +

Screenshot shoing how to add an app to a teams meeting


Then enter q in the search box or find the Q&A app in the list of apps …
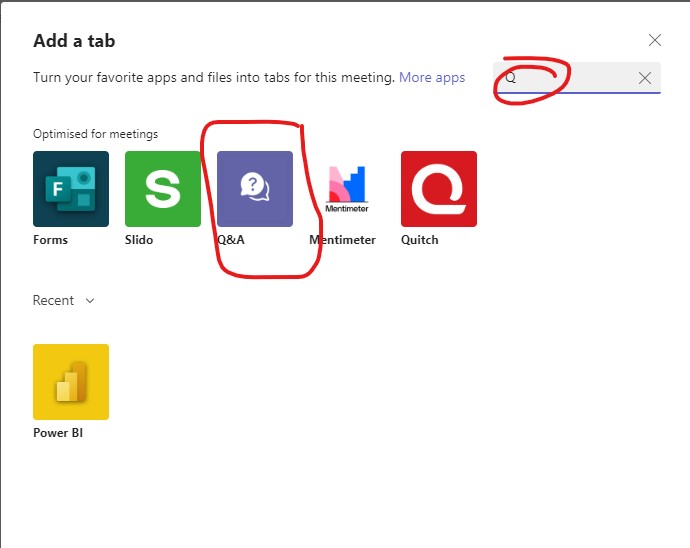
 

Screenshot showing how to find hte Q&A app


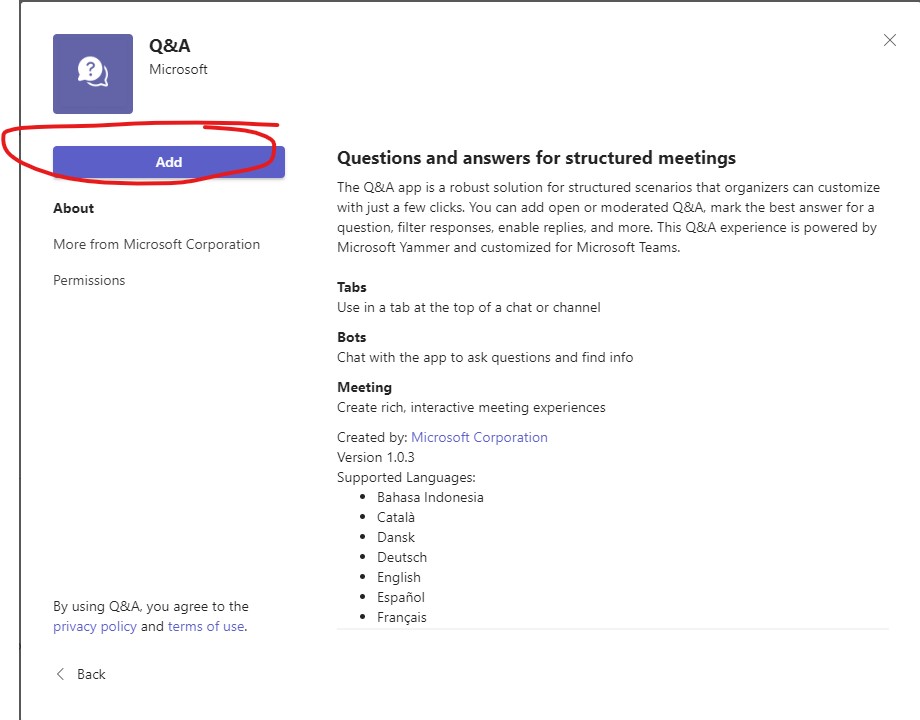
Select the Q&A app and choose Add …


Screenshot showing how to add the Q&A app


Select the option for moderated questions (NOTE that you cannot turn this off later – once it is on it stays on for the meeting) then click save …
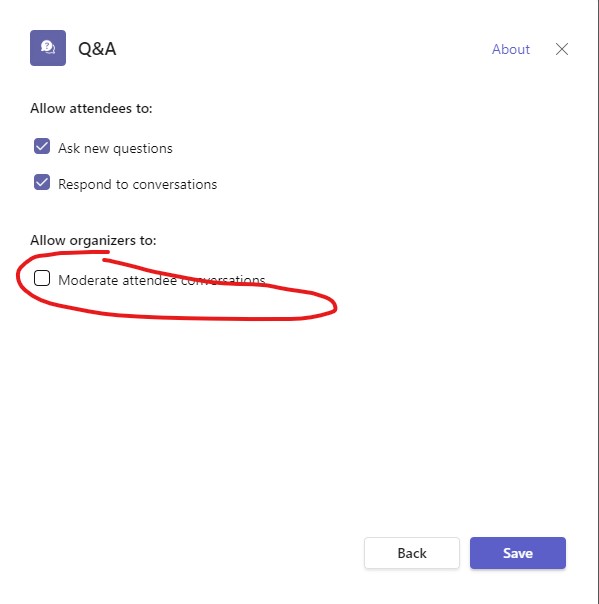
 

Screenshot shoing how to moderate the Q&A function


The app then adds an additional “tab” to your meeting from where you can see the questions including htose which have been published and dismissed.  You can also change some settings to stop further questions – this may be useful after your meeting finishes.


Screenshot showing the Q&A app within the team meeting


Adding Polls to Team Meetings

You can now use Forms to add Polling options to Teams meetings.  For channel based meetings this only delivers basic multiple choice polls, but for direct invite teams meetings you can deliver multiple choice polls, quizes and word cloud polls.

  • A Poll is just a question and a series of answers (where there may be a single choice or multiple answer option).
  • Quizzes – like a poll but you can set an option as the correct answer – great for offering self marking polls to assess progress in a lecture or course.
  • Word Cloud polls – us a text entry answer and then deliver the words as a word cloud with the most popular answers creating larger words in the resulting cloud.

To add a poll do the following:

Click the + sign in your teams meeting entry (just like above).  Then search for and choose Forms (may also appear as Polls soon!)
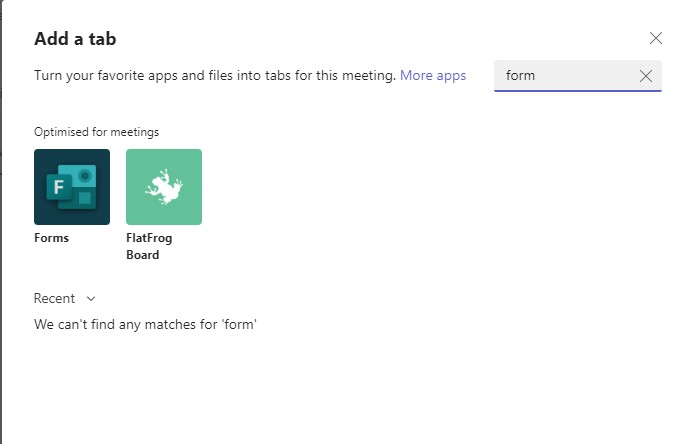
Screenshot showing how to add polls to a teams meeting


Then click on Save to add the forms app to the meeting.
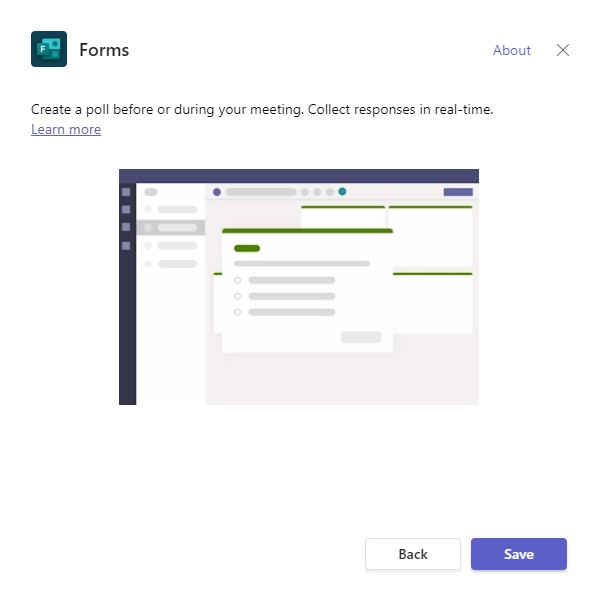
 

Screenshot showing how to save polls as an app into Teams meetings


Once added you can choose to create a new poll …


Screenshot showing how to create new poll


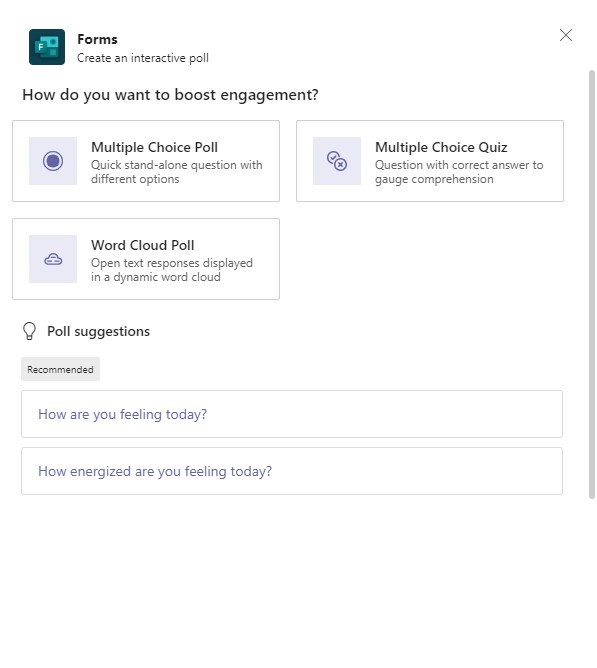
Then choose your poll type …


Screenshot showing choice of poll type


Create your poll and add additional options as needed.  Remember to set the anonymity options and results options as you need.
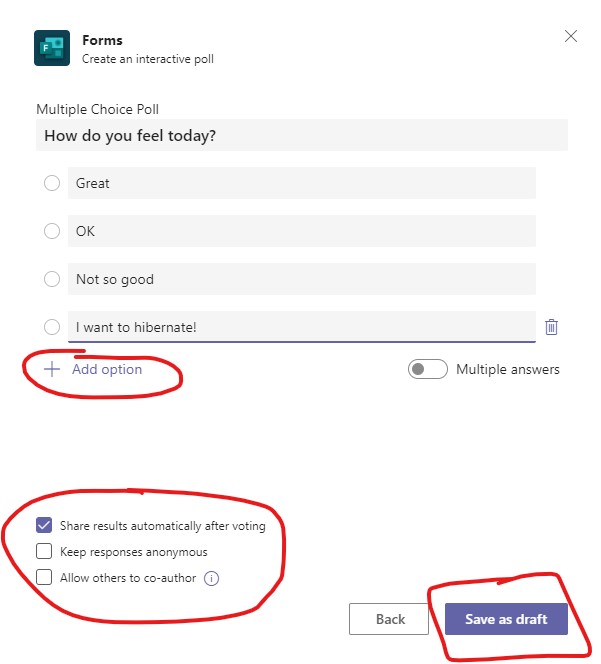
 

Screenshot showing how to create a poll question with multiple answers


Once saved as a draft, you can choose to Launch the poll into your meeting, edit it further or delete it.
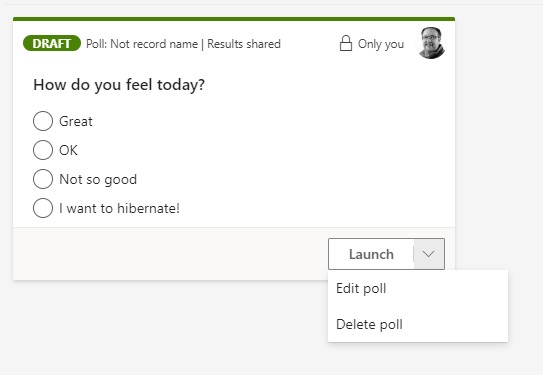
 

Screenshot shoing how to launch, edit or delete a poll


Once you have launched a poll you will be able to close it so no more responses are collected, see the results or delete it.


Raise Hands – what order did they go up?


In large meetings with lots of hand raising it can be difficult to work out who is next to speak or have input to the meeting.  Now when your meeting colleagues use the “Raise your hand” feature Teams will provide a visual indication of the order in which the attendees raised their hands, allowing you to ensure that you don’t miss people out when it is their turn!


Raise hands - numbered view

OneDrive for Mac OS – Big Changes Happening NOW – February 2022

What is happening and why?


Apple is changing the technology that they use within their operating systems and as such Microsoft, along with all other cloud storage providers have to update their sync clients.

This means that the OneDrive sync client is going to change for Apple users, and has already started to for some.

For a while it means that there will be multiple versions in use depending on the version of the Apple OS that you are using.

ICT encourages you to update to the latest ICT supported version for your hardware at your earliest convenience to ensure that your system remains up to date with security and functionality patches and fixes.

The main change that you will see comes to the feature known as “files on demand”.

This is NOT a new feature, but the implementation and use is changing.


Who is affected?


Initially the changes apply to those with macOS 12 (Monterey).  If you use macOS 11 (Big Sur) or earlier then this doesn’t affect you.


The current version of Monterey (v12.2) is the last that will support the old technology.  The new Files on Demand feature is available for all versions of Monterey from 12.1 upwards.


What happens?


When you update your macOS to v12.2 or 12.3 your OneDrive sync client will also be updated automatically.


You will no longer be able to choose whether to turn on Files on Demand – it is mandated and will be on from the point of upgrade.  There is NO option to turn off Files on Demand.


How does Files on Demand work?


Instead of downloading the whole content of your OneDrive onto the local hard drive, or having to choose which folders and files you sync locally, the client creates what are called Symlinks.  Essentially these are like bookmarks or empty entries for the files and folders.


When you browse your local version of OneDrive the files and folders appear to reside ont he local disk, but in fact they are just pointers to the cloud stored versions.


When you open a file the OneDrive sync client kicks in and in the background it downloads a local copy.  Then it looks for changes to the file and sycns those changes as they happen.


This optimises disk space and is very useful for those with smaller storage devices – Solid State Drives (SSDs) are typically 1/4 of the size of traditional spinning disks but are used widely because they are much faster and provide much better performance and long term stability.


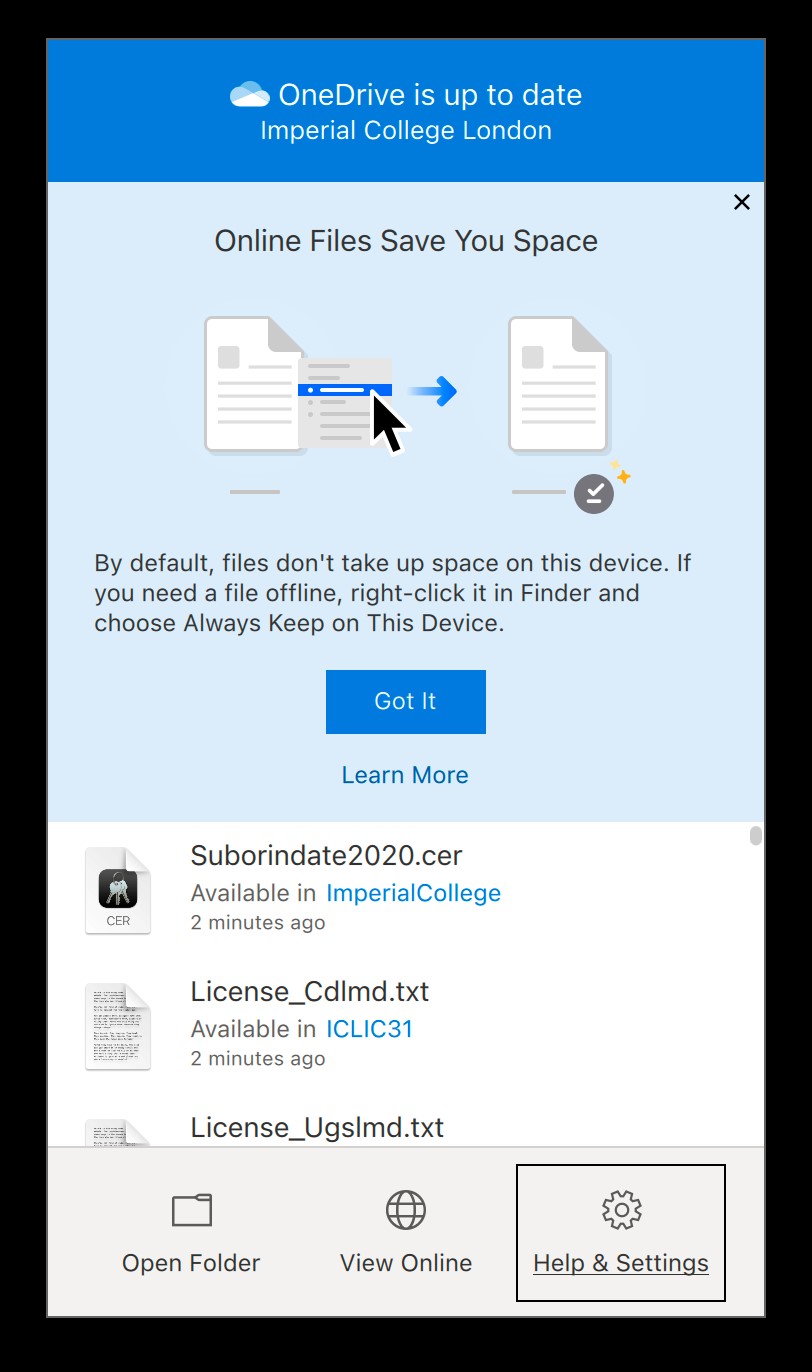
In Finder you will have the option to select a file or folder and then “Always Keep on this Device” or “Free up Space”.


  • If you choose to “Always Keep on this Device” then a copy will be stored locally and synced between the cloud storage space and your local drive.


  • If you have a local copy but need to free up space then choose the “Free up Space” option to return a file or folder to just being stored on the cloud and release back the local storage on the machine that you are using.

Screenshot of new OneDrive syunc client and notification of changes


What to do next?


If you are thinking about upgrading your Mac then use the following as a set of sensible precautions.

  • Update to macOS v12.3 at some idle or downtime. Don’t do it in the middle of an important job, just in case there’s a problem.
  • Update with a stable Internet connection.
  • Ideally do the macOS update at the end of the day and leave your Mac on overnight to give OneDrive a chance to update all the files and settings.
  • Backup before switching. Happily there’s already one or two backups in place.
    • OneDrive saves all deleted and changed files for 30 days.
    • Apple TimeMachine, if enabled, also has a copy of current and past files.
    • If you wanted to be very sure, make a separate copy of all your files, especially those in OneDrive storage.


Conclusion


Before you go complaining about Microsoft, this change is being forced on Microsoft and other cloud storage providers by Apple.

If you want more details then Microsoft have written a blog post about this and include answers to many questions.  I’m not going to duplicate what they have done elsewhere!

Multi Factor Authentication

What is Multi Factor Authentication?

Multi Factor Authentication (MFA) adds an additional authentication step when authorising access to College resources.  Your college username and password provide a level of protection for access, but adding an additional factor that you control adds greater security.  By using MFA you have an additional control in securing your login.

Why is Imperial using MFA?

MFA is now enabled for all Imperial accounts (staff and students) to provide additional security and reduce the potential for account compromise.

How to do “easy” MFA

The best tool to enable easy MFA is the Microsoft Authenticator app available for Android and iOS (Apple) devices.

ICT encourage all users to use the Authenticator app.  Download to a personal or college device and use to authenticate your sign-in.  Provide a code from the app or choose to respond to “push” notifications (allow or deny the request).

If you have a suitable watch (Apple watch, Samsung watch or other connected device) you can respond directly to push requests from the watch interface.

ICT recommends using the app rather than a phone call or text message.  There are documented cases of “SIM cloning” to intercept phone calls and text messages.

Additional Support

There is more information and instructions on how to set up the authenticator app on the Microsoft support pages.

If you need additional help contact the ICT Service Desk using the Self-Service pages.

New Search in MS Teams Desktop

In November 2021, Microsoft will make the new desktop search facility live in MS Teams Desktop applications.


When is the Change Happening?

Microsoft expect to start rolling this out to tenants globally at the beginning of November 2021 and for the rollout to be completed by 30/11/2021.


What is Changing?

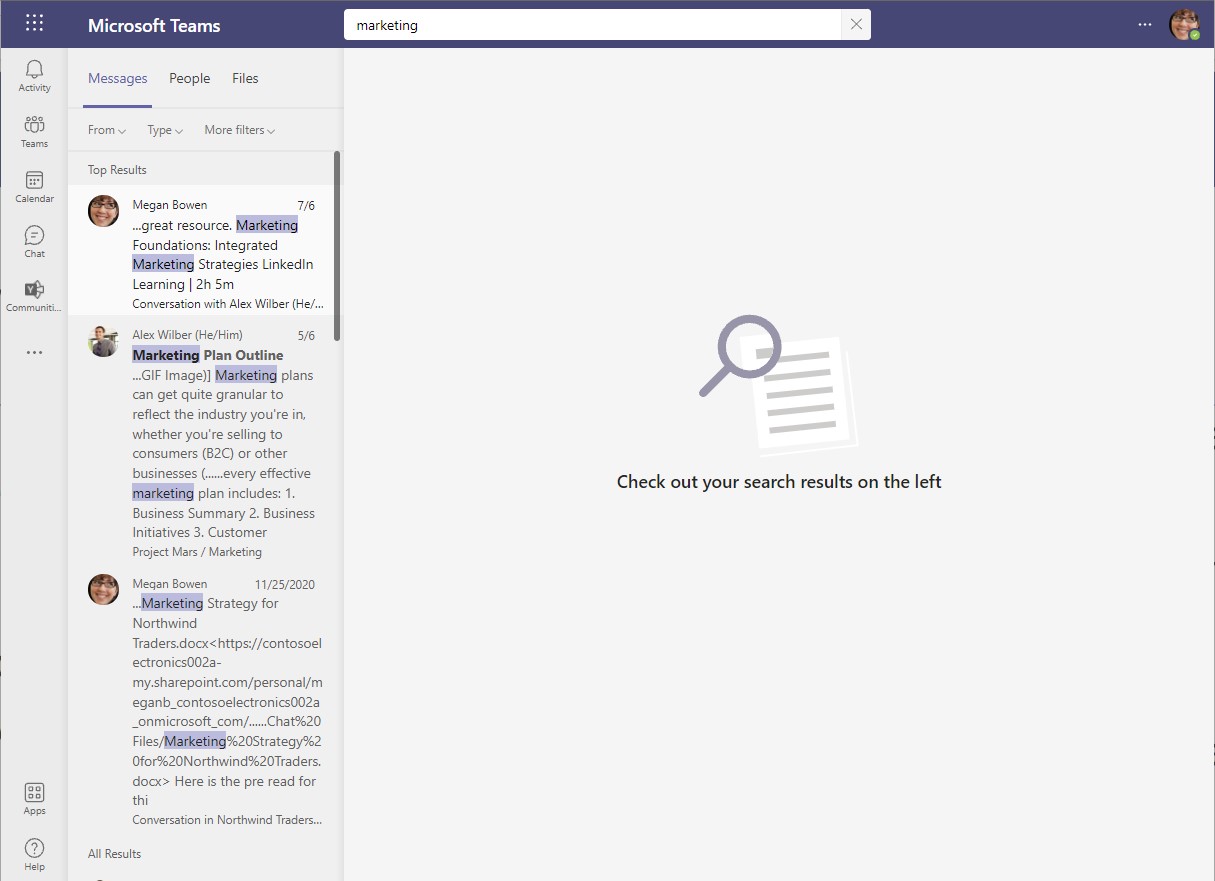
Currently when you use the search box in Teams the results are returned as a list in the “context” pane of Teams.  See the screenshot below for how this currently looks.


Screenshot of current Teams Desktop Search


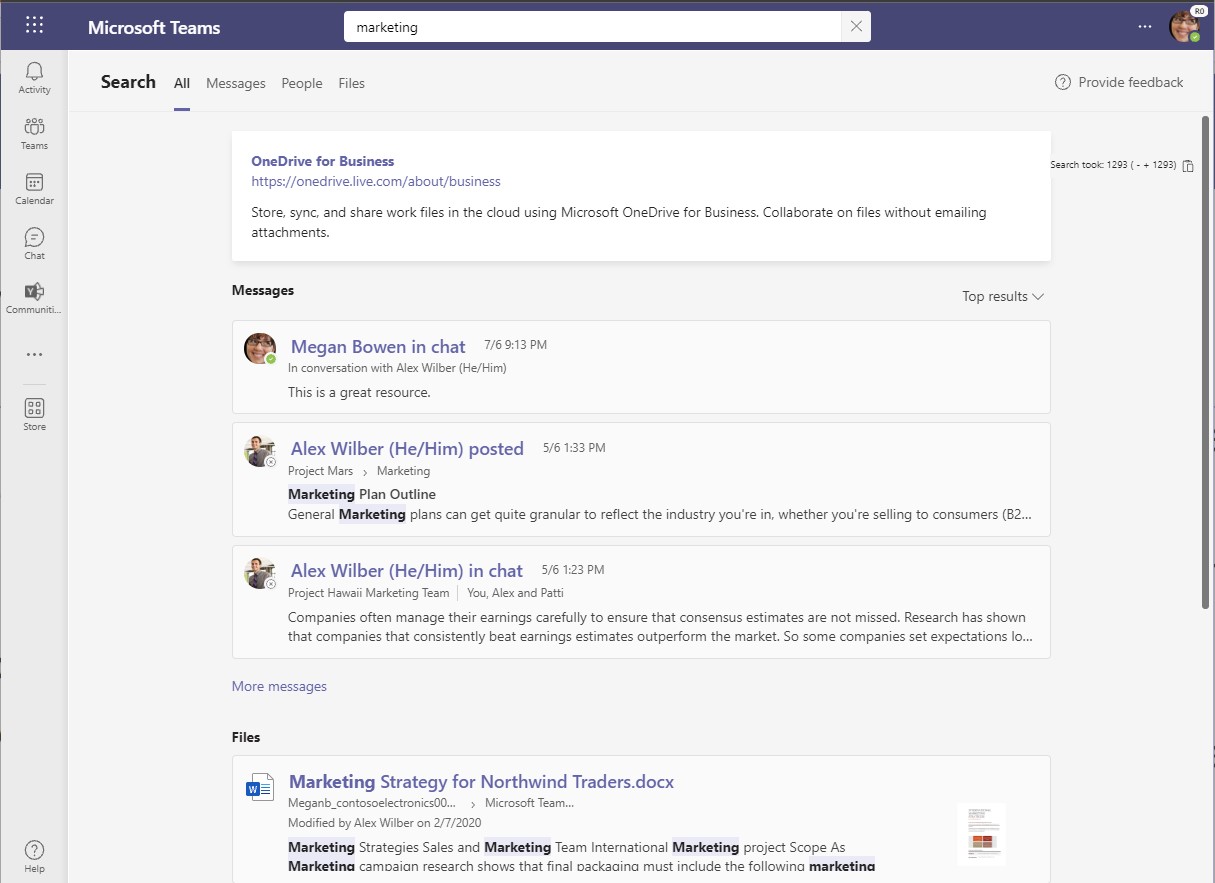
When Microsoft complete the rollout of the new search offering the results will appear as a single central pane, as per the screenshot below.


Screenshot of new Teams Desktop Search results


Filtering the results in the new experience will be simpler and easier as you can jump straight to the category of results that you are looking for, e.g. files or messages, etc.


What do I need to do?

No action is required by staff and students.  The change will automatically be applied across the whole tenant and all users will in time see the change in how the results appear.

Office 365 Training – New Dates for 2021 / 22

Flipped open silhouette of a head with Office 365 app icons


New sessions are now bookable for the following Office 365 courses.


Getting Started with Office 365

This course covers the basics of Office 365 to help you get started and be confident using One Drive for Business, Office Online and to work with colleagues on shared documents.

Running at 10am on the following dates:

6 December 2021
5 January 2022
3 February 2022
1 March 2022
7 April 2022
3 May 2022
8 June 2022
4 July 2022

Click here to book.

Collaborating with Microsoft Teams

Do you want to know how to do more with Microsoft Teams, collaborating with your colleagues, working in a single multifaceted workspace?  Come and find out how to do more with Microsoft Teams.

Running on the following dates (usually at 2pm):

6 December 2021
5 January 2022
3 February 2022
3 March 2022 (10am)
7 April 2022
5 May 2022 (10am)
8 June 2022
4 July 2022

Click here to book.

OneNote

Join the OneNote training to find out how you can replace the paper notebooks, search for content and use the “swiss army knife” app that is included in your Office 365 subscription.  In addition to looking at personal Notebooks, the course touches on the use of Class and Staff notebooks for teaching and management purposes.

Spaces are available on the following dates:

9 December 2021
13 January 2022
15 February 2022

Book a place here.

Power Automate

This introductory course will help you get started with Power Automate – understanding the basics and how to build automation for personal productivity.  Automation can help with saving time and reducing errors by removing the human element from repetitive task processing.  Build it once, reuse the process time and time again in a repeatable method.

Courses are running on the following dates:

11 January 2022
11 April 2022
14 July 2022

Book a place here.

Webinars

Available on demand most Tuesdays from 2.45pm.

Learn about the new Webinar feature in Teams and attend the training so that you can then request the Webinar feature for your account.

Book a session here.


The New Whiteboard Experience

The New Whiteboard is available NOW in Teams, web browser and Android app.


Updated versions for the Windows app and for iOS devices are expected in late October.


You can find out about all the new features on this technical community post from Microsoft …


Welcome to the new Whiteboard! – Microsoft Tech Community


New or updated features include the new Sticky Notes and Grids, New templates for Whiteboards, Reactions, and easier “snap to” functions.

Reply to messages in Microsoft Teams

The Microsoft Teams mobile clients (iOS, iPad and Android) have, for some time, allowed users to create contextual replies by adding the original post as part of the reply.


This feature is now available for Desktop versions of Microsoft Teams and should roll into the web version in due course.


To use the feature, click on the elipsis for the comment that you wish to reply to and select reply …

Screenshot showing the reply option in Teams chat


When you click reply, the original message appears in a quoted format …


Screenshot shoing the reply to teams message once reply is clicked


New ways to Share Content in Microsoft Teams meetings

With continued remote and hybrid working, Microsoft have introduced new methods for sharing content into meetings in Microsoft Teams.


These new features are rolling out now and should be fully available by mid October 2021 at the latest.


You can now share content from an additional camera – so if you have a plug in USB web cam you can use it as an alternate visualiser to deliver details from a document into a meeting.  Clearly for best results you will want to find a means to ensure that the camera is held at a steady and regular position – so mounting using a clip or bulldog clip will keep a fixed position for the camera.


You can also use the build in webcam on a laptop to project a physical whiteboard into the meeting.


To enable and use these features go to the share option in your Teams meeting …


Share tray options in a Teams Meeting


Select “Content from camera” …


Then choose what you want to present into the meeting …


Content from Camera sharing dialogue

Microsoft Teams – Breakout Room Enhancements

Microsoft have released a number of Breakout Room enhancements into Public Preview in Microsoft Teams.


To use these features in advance of General Availability, you will need to enable the Public Preview mode (see this blog post on how to do this).


Pre-Meeting Breakout Room Configuration

You can now set up breakout rooms in advance of your meeting and, if you wish, pre-populate the attendees, either manually or automatically.


Creating Rooms

To do this, create your meeting and then double click on the meeting entry in the Teams calendar.  You’ll find a new “Breakout Rooms” tab.

Screenshot of breakout rooms tab in meeting controls


When you first go into this tab you will see an option to create rooms …


Screenshot of breakout rooms tab - create rooms


Clicking on the create rooms button then brings up a dialogue box which will allow you to set up an initial number of breakout rooms.  You can create between 1 and 50 rooms.


Screenshot of create initial rooms dialogue

Clicking on the “Add rooms” button adds the required number of rooms to the meeting.


Assigning Participants

Once the rooms are created you can assign participants to a room.  Click on the “Add Participants” button on the breakout room page to set automated or manual assignment of users to rooms and then as appropriate choose participants.

Assign participants button


automatic or manual participant assignment


dialogue shoing manual assignment of particpants

Edit the Room Settings

Once the rooms are created you can edit the rooms to give each room a name, and you can edit the meeting room settings for each room (so you can set presenters for a breakout room).

To edit the name of the room click on the elipsis on the room and choose Edit

Edit rooms settings and name


Set the name for the room


Screenshot of dialogue shoing room name change


Use the settings to set specific meeting options for a breakout room


Meeting Options for a breakout room


Adjusting General Breakout Room Settings

Click on the cog wheel on the top right of the Breakout Rooms tab

Editing General Breakout Rooms settings


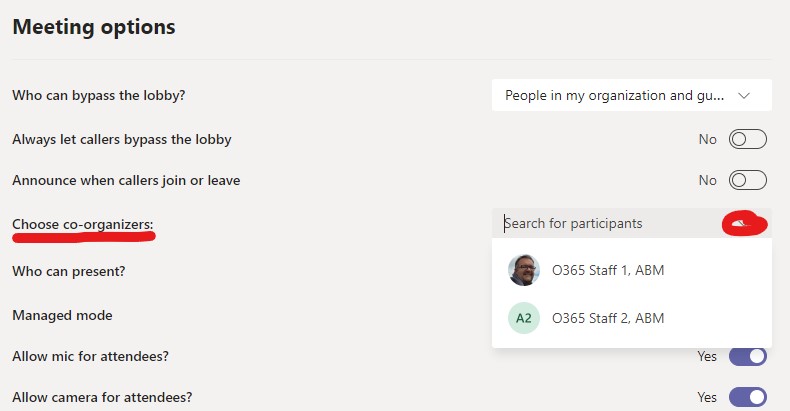
In the settings you can assign other presenteres to manage breakout rooms – wehn you do this only one person can manage the breakout rooms at any one time so you might just want to add a single co-organiser to the manage rooms function.


You can also set time limits for your breakout rooms, turn on or off the automatic movement of people to rooms when you “open” the breakout rooms from your meeting and you can enable an option that allows people to manually return to the main meeting.

Setting co-orgainisers and other general breakout room settings


Microsoft Teams – Enabling Public Preview Features

A number of features are now being made available by Microsoft in “Public Preview” to ensure that the features meet the requirements and work as expected.


Public Preview gives Teams users the opportunity to try these new features before they reach “General Availability” for all users.


Imperial College staff can now enable access to Public Preview features in Microsoft Teams by clicking on the elipsis beside the user initials or profile photo, choosing the About section and clicking on Public Preview.


Screenshot of how to enable Public Preview mode in MS Teams

If you choose to enable Public Preview then you should be aware that some features may be removed by Microsoft if they are not functioning as expected.  Preview is an advance option and not all your colleagues will choose to use this function.


ICT’s Service Desk may ask you to turn off Public Preview when asked to assist with fault diagnosis to eliminate preview functions as the cause of issues.