Tag: Microsoft 365

Pronouns in Microsoft 365

The new Pronouns feature has arrived for Teams and will be rolling out across contact cards in Microsoft 365 more widely in the coming months.

Using the Pronouns option allows you to easily add your preferred set of Pronouns, either from the suggested set, or by creating your own.

Adding Pronouns is easy to achieve by following these few steps …

1. Click on your profile picture / initials in MS Teams

2. Click on your name to go into the profile “card” where more information about you is available.

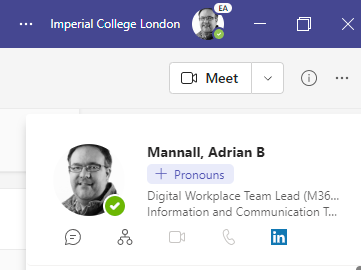
3. Underneath your display name there is a “+Pronouns” button (or your chosen pronouns if you have already done this at least once.


Screenshot showing how to get to the pronouns feature on your M365 digital contact card
Where to find the pronouns feature


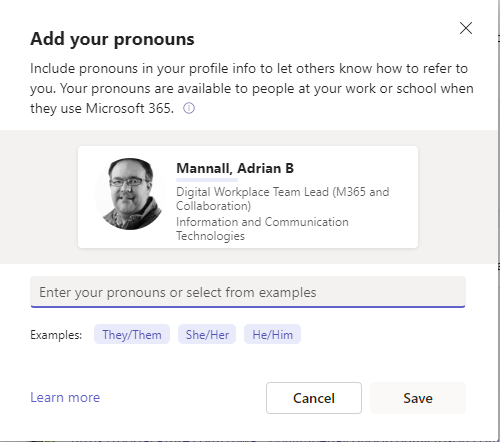
4. Click on the Pronouns button and choose the prnouns that you wish to add.


Screenshot showing how to set the pronouns of your choosing
Pronoun setting page


5. Click Save to complete the update of your Pronouns.

SharePoint – Essentials

The Microsoft 365 suite contains many powerful tools and services.  SharePoint is the most fundamental in delivering storage to support almost all these services.

SharePoint can, however, be confusing so in this blog post we’ll aim to try and clear up some of the confusion.

If you take only one thing from reading this post it should be this …

    • One Drive for Business is for Personal file storage.
    • SharePoint is for group files.
    • SharePoint is for much more than just storing group files.

So let’s dig into this a bit more …


1. Fundamentals.

SharePoint is NOT just another file share (or the place where your group files are going to be moved to)!  SharePoint contains many useful elements and for some it is the versatile swiss army knife of collaboration.

A SharePoint site can not only deliver file storage so that you and your work group, department or faculty can work together on files.  It can also deliver pages of information, news, and act as a landing page for your team where they can discover what’s happening and see updated information.

For this to work, you are going to need to understand some other concepts and have people who are prepared to manage and update the site and pages.


2. OneDrive for Business vs SharePoint.


As already stated, OneDrive for Business (ODfB) is for personal file storage.  ODfB is NOT for long term sharing or storage of group files.

You can see our One Drive for Business Basics blog here.

SharePoint is the place for Group files and group working.


3. What’s a Site, a Page, a Document Library and a Web Part?


SharePoint Site – is the collection of pages, documents and information delivered as a managed area where you can set specific access rights for a group of users.

Page – is a webpage in the SharePoint site.  You can deliver information and dynamic access using “web parts”.  A web part is a function which can help you to show information such as a time in a different location, weather or a collection of files or other useful elements.

Document Library – this is a storage space where you can group files and then grant access to a group of people to the whole library.  So for example you might want to include different sets of useful information or files into a discreet document library – e.g. finance files in a separate document library from HR files or work instructions, or maybe you want a more easily accessible video library of meeting recordings or training videos.

Web Part – this is a small piece of pre-written code that is built to work on a SharePoint page to allow you to deliver some specific information.


4. Security in SharePoint


When a SharePoint site is created it comes with three default groups – the Owners, Members and Visitors groups.

Owners – these are the people responsible for the maintenance and upkeep of the site.  They have the ability to add people to the other groups (Members and Visitors), create new groups and add people to those groups, change the access controls and generally have a large range of controls.

Members – these are the regular collaborating users in the group / department / faculty.  They generally have edit access to the site so can potentially add and update new pages, add, edit and delete files from document libraries and see what is in the site.

Visitors – the people added to the visitors group usually have “read only” permission – so they can read pages of information and view files within the document library, but they can’t edit the files.

So the default permissions are …

Site Owners = Full Control
Site Members = Edit
Site Visitors = Read

It is possible to change the access for a page or a file so that a restricted set of people have access, or to grant additional people access to a resource within the SharePoint site.

The other permissions that can commonly be granted to users or groups of users are as follows:

Full Control – Has full control
Design – Can view, add, update, delete, approve, and customize
Edit – Can add, edit and delete lists; can view, add, update and delete list items and documents
Contribute – Can view, add, update, and delete list items and documents
Read – Can view pages and list items and download documents
View – Can view pages, list items, and documents but not download

NOTE the difference between Read and View – a user with view access cannot download a document but someone with Read access can!


5. Metadata


Metadata is a means of filtering or refining a data set.  So in SharePoint that might be a list of recordings, but with metadata you can filter based on the subject covered, etc.  In the exaple shown below we have added a column to contain metadata about the subjects covered in some videos.


Image of a SharePoint library showing metadata


6. Syncing


The simple rule here is … DON’T Sync SharePoint libraries.

SharePoint document libraries are generally VERY large.  When you sync a document library (or add a shortcut to OneDrive for Business) then the library or shortcut linked area get synced using the OneDrive for Business sync client.

If you have a whole department’s or research group’s files in a SharePoint document library then you also run the risk of accidental deletion and potentially then not being able to recover files.

As an example, after syncing just 35,000 files from a library containing 230,000 files,  it took over 2 hours to “un-sync” the library!  That’s on a VERY fast (1.2Gbps) fibre optic internet connection with zero contention.

Microsoft’sown documentation has limits and guidance on the total number of files that you should sync across One Drive for Business and synced SharePoint libraries (your “sync set”).  Many SharePoint libraries would breach this recommendation in their own right, let alone as part of a larger “sync set”.

Imperial ICT do NOT recommend syncing of SharePoint document libraries and in fact on many SharePoint sites the functionality is disabled to prevent offline file storage (synced files).


One Drive for Business – Basics

One Drive for Business (ODfB) is the personal storage area assigned to each user as part of their Office 365 license.

One Drive for Business is delivered as a “personal SharePoint site”.  You get all the great SharePoint features such as collaboration and co-authoring if you choose to share a file (see below for some guidance), but it is a personal site.

If you look at the address for your One Drive for Business, you’ll see that it has “-my” after the tenant name but that it sits on SharePoint, and the address also contains your User Principle Name (but with the @ and . characters replaced with _).

Quota

Within Imperial College London, every user gets an initial quota of 5 Terra Bytes (5TB) of storage space.  If you manage to fill that (and there’s no competition to try!), then we can extend your quota further should you need it.  We can only do that once your One Drive for Business is consistently using more than 90% (4.5TB) of the quota.

OK – so how much is 5TB really?

85,000 CD quality MP3 tracks – roughly equivalent to 1,000,000 hours of listening, which is about 114 years of back to back listening.

or

1.5 million photos

or

2,500 DVD quality movies


File Versioning

OneDrive for Business and SharePoint both support automatic file versioning.  So you don’t have to add version numbers onto documents any more, nor do you have to remember where you are up to.

When you open a file from your ODfB the default is to open the current version.

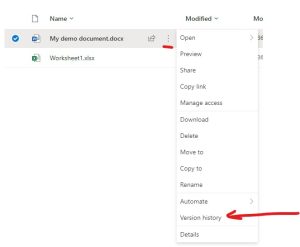
You can see all the versions of a file by clicking on the vertical dots to the right of the file name (when you hover over the file in the browser) and then choosing Version History.

Screenshot showing how to find version history for a file on OneDrive for Business

Screenshot showing how to access version history.

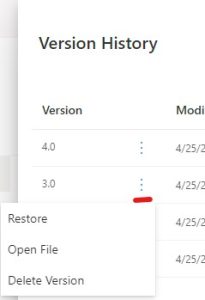
Once you have the version history open you can choose to delete a version or restore an earlier version.  Alternatively you can open a version so that you can compare it against the current version.
Note – you can only Open the current version (you can’t restore it because it is the most up to date version and you can’t delete the current version).

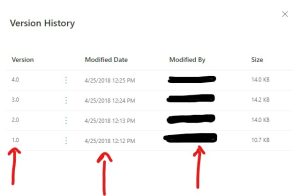
Screenshot showing version history for a file

Screenshot showing version history for a file.

Screenshot showing options for a file version

Screenshot showing actions that can be carried out on a version of a file.

Recycle Bin

You can delete a file or version of a file and then restore it for yourself.

This works for 90 days, after which you will need to ask ICT for assistance, up to 180 days.

If you deleted it more than 180 days ago, then it’s gone for good.

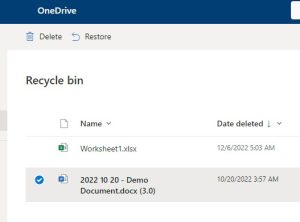
Use the Recycle Bin link in the navigation bar on the left side of your ODfB to see the files and folders that you deleted.

Screenshot of recycle bin

How to access the Recycle Bin in One Drive for Business.

Select a file or version of a file to then be able to restore the file.

Screenshot showing how to restore a file or file version from the recycle bin

Screenshot showing how to restore a file or file version from the recycle bin


Sharing

Do NOT share files with large numbers of people or for long term sharing.  Use a SharePoint site for long term group access or sharing.

Sharing from your One Drive for Business is designed for short-term, small-scale collaboration.  It is NOT designed for you to deliver long term access or to run a group or department file share.

N.B. If you have shared files and are leaving College then you need to give those files to someone else – when you leave College your license to access Microsoft 365 will be revoked and your personal One Drive for Business data will be deleted automatically.

Imperial College London do NOT allow “anyone” sharing.  Anonymous links are dangerous and can lead to serious GDPR data breaches.


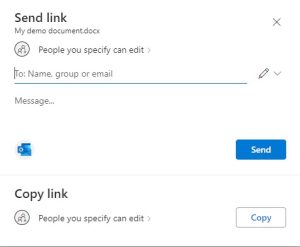
Screenshot showing how to start sharing wizard

Screenshot showing how to start sharing wizard


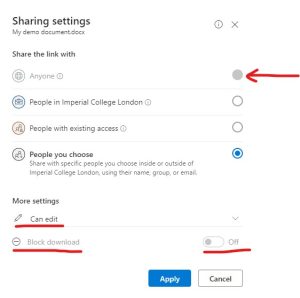
The sharing controls

The sharing controls


Advanced sharing controls

Advanced sharing controls

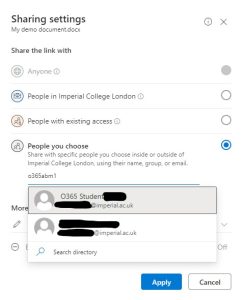
You can share directly with people, either by selecting them from the internal directory, or with external people by entering their email address or institution UPN.

Screenshot showing how to add people to sharing

Screenshot showing how to add people to sharing

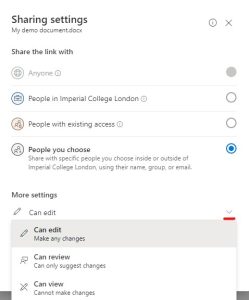
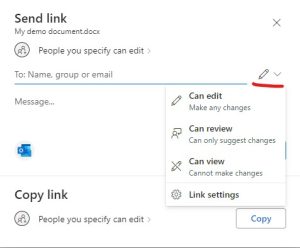
When you choose to share you can control what level of access is provided (Edit, Review or Read).

Sharing access levels

Sharing access levels


Sharing access levels - main sharing dialogue box

Sharing access levels


You can also see what you have shared by using the Shared link in the left navigation bar in ODfB.  You can then choose between the files that have been “Shared with you” (i.e. shared by others for you to read, review or edit) or “Shared by you” (your files which you have shared).

Screenshot showing shared files

Screenshot showing shared files


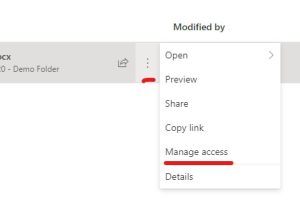
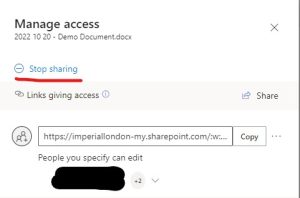
You can control the access at any time.  Select the file or folder and then click on the menu and choose “manage access”.  You can stop all access by clicking on the “Stop sharing” option at the top, or you can change the access for individuals who no longer need access.


Access to manage access

Access to manage access


Managing access

Managing access


What’s a UPN?

Your UPN is your User Principle Name.  At imperial we use username followed by the domain (which means it is different from our primary email address).  Other institutions may well also have a UPN which is different to the primary email address.

If you are sharing with others then ask them if they have a Microsoft 365 UPN (i.e. do they login with something other than their primary email address).

UPNs are also used when adding people to Microsoft 365 groups to ensure that the user is correctly authenticated and access is granted appropriately.

If you are being added to a group (Team or email group) at another institution, make sure that you have given them your UPN for seamless access.

Office 365 Ask Me Anything (Well Almost) – 2022 / 23

What?

We’re pleased to announce our new season of Office 365 Ask Me Anything sessions for the Academic Year 2022 / 23.

When?

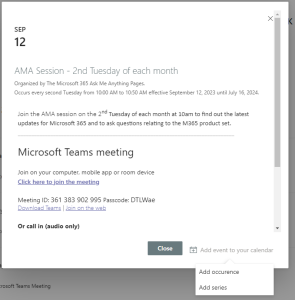
These will start on Tuesday 13 September 2022 at 10am and then be held on 2nd Tuesday of the month at 10am and on the 4th Tuesday of the month at 9am.

We’re varying the times a little as we know it’s not always convenient to make a 9am or a 10am slot.

We also know there are some clashes so we’ll try to move things for obvious clashes of date.

Where?

Online using Microsoft Teams

Who?

These sessions are open to all staff to join, listen, watch and ask questions about components of Office 365.

More Info

Whether you want to know about Teams Meetings or Webinars, new functionality being introduced or how to do something clever in Power Automate come along and find out more.

Some sessions will have a particular focus while others will be completely open.

How?

Sign up by completing the online form.  We’ll then add you to the sessions.


Group your Microsoft Forms

Lots of Microsoft Forms?  Struggling to find the right one(s)?


You can now group your forms into Collections to make it easy to find forms or keep similar forms together.


How do I do that?

  1. Go to forms in Office 365 (https://forms.microsoft.com).
  2. Scroll down and click on the All forms link to the bottom right of the screen …
  3. In the top right click on the “New Collection” link …Screenshot showing the "new collection" link in Forms.
  4. Name your collection
  5. To assign a form to a collection click on the three dots on the form and choose “move to collection” and then the collection that you wish to usescreenshot showing move to collection in Microsoft Forms
  6. Once you have added forms to a collection you will see your collection in the forms pages and can drill into a collection to use the forms like normal.  You can also create new forms in a collection directly.Screenshot of a forms collection


Microsoft Teams – Breakout Room Enhancements

Microsoft have released a number of Breakout Room enhancements into Public Preview in Microsoft Teams.


To use these features in advance of General Availability, you will need to enable the Public Preview mode (see this blog post on how to do this).


Pre-Meeting Breakout Room Configuration

You can now set up breakout rooms in advance of your meeting and, if you wish, pre-populate the attendees, either manually or automatically.


Creating Rooms

To do this, create your meeting and then double click on the meeting entry in the Teams calendar.  You’ll find a new “Breakout Rooms” tab.

Screenshot of breakout rooms tab in meeting controls


When you first go into this tab you will see an option to create rooms …


Screenshot of breakout rooms tab - create rooms


Clicking on the create rooms button then brings up a dialogue box which will allow you to set up an initial number of breakout rooms.  You can create between 1 and 50 rooms.


Screenshot of create initial rooms dialogue

Clicking on the “Add rooms” button adds the required number of rooms to the meeting.


Assigning Participants

Once the rooms are created you can assign participants to a room.  Click on the “Add Participants” button on the breakout room page to set automated or manual assignment of users to rooms and then as appropriate choose participants.

Assign participants button


automatic or manual participant assignment


dialogue shoing manual assignment of particpants

Edit the Room Settings

Once the rooms are created you can edit the rooms to give each room a name, and you can edit the meeting room settings for each room (so you can set presenters for a breakout room).

To edit the name of the room click on the elipsis on the room and choose Edit

Edit rooms settings and name


Set the name for the room


Screenshot of dialogue shoing room name change


Use the settings to set specific meeting options for a breakout room


Meeting Options for a breakout room


Adjusting General Breakout Room Settings

Click on the cog wheel on the top right of the Breakout Rooms tab

Editing General Breakout Rooms settings


In the settings you can assign other presenteres to manage breakout rooms – wehn you do this only one person can manage the breakout rooms at any one time so you might just want to add a single co-organiser to the manage rooms function.


You can also set time limits for your breakout rooms, turn on or off the automatic movement of people to rooms when you “open” the breakout rooms from your meeting and you can enable an option that allows people to manually return to the main meeting.

Setting co-orgainisers and other general breakout room settings


Microsoft Teams – Enabling Public Preview Features

A number of features are now being made available by Microsoft in “Public Preview” to ensure that the features meet the requirements and work as expected.


Public Preview gives Teams users the opportunity to try these new features before they reach “General Availability” for all users.


Imperial College staff can now enable access to Public Preview features in Microsoft Teams by clicking on the elipsis beside the user initials or profile photo, choosing the About section and clicking on Public Preview.


Screenshot of how to enable Public Preview mode in MS Teams

If you choose to enable Public Preview then you should be aware that some features may be removed by Microsoft if they are not functioning as expected.  Preview is an advance option and not all your colleagues will choose to use this function.


ICT’s Service Desk may ask you to turn off Public Preview when asked to assist with fault diagnosis to eliminate preview functions as the cause of issues.

Office 365 Champions – Join the crew!

Here at Imperial we have a group of Office 365 champions.  We encourage all who are interested in sharing their knowledge and helping others to become a champion.


We don’t set hard and fast qualification criteria, nor do we limit the numbers – we want you to come and join, share what you do with Office 365 and how you use the tools in your area.


We have champions who are gurus in Power Apps, Forms, Power Automate, Teams, SharePoint and the common Office apps.


What’s in it for you?


A chance to join a group of likeminded staff (and students) who are happy to share what they are doing and how they use the tools to make life simpler, easier or more productive.


A pin badge – we have some specially made Office 365 Champions pin badges which we will distribute to our champions – you can add it to your work lanyard so that your colleagues know you’re one of our champions – that might mean you get asked some questions that you don’t know the answer to, but as a group we can solve most things!


Meet-ups (currently virtual, but we hope to have some “in person” sessions in the future) where you can hear about what others have been doing or even have a go at telling us what you have been doing.  If nothing else it’s a great place to practise those presentation skills in a friendly environment.


What’s your commitment?


Being a champion – being the mouthpiece for collaboration tools and telling people about the new features and ways in which they can use Office 365 to collaborate.


Being a first contact – your colleagues may come and ask you first about Office 365 features – it’s OK you really don’t have to know everything.  We are a growing community of interested people who help each other out.  You might know about Teams or Word in huge detail, while others will know about forms or bookings.  We have a team where you can find others who can help if you have questions that are outside your comfort zone.


Join Us.


Complete the form to sign up and join the other Office 365 champions around College.


Word – Track Changes

Have you ever shared a Word document and wondered which elements people are changing or adding?


When you share a document via your One Drive for Business or SharePoint you enable people to work on the original document without having to co-ordinate multiple edits at a later date (no more copying and pasting), but how do you know what has changed?


You may have come across track changes in the full version of Word – it has been available for a very long time, but it’s also come to Mac OS versions of Word and most recently to the Web and iOS versions of Word.


This means you can now see all those edits (and who made each one) and choose which ones to accept and which to reject.


There’s more information on Track Changes in Word within this Microsoft Support Page – just pick the right version of Word to see how to use Track Changes within that version.

Teams Meetings – Presentation Modes

Two new modes for presenting content and video into a Microsoft Teams meeting will be introduced during late August and early September.

What is available?

  1. Side by side mode – allows the video of the presenter alongside the content being delivered – similar to the effect that has been available in a live event.
  2. Reporter mode – superimposes the content over the shoulder of the presenter’s video in a similar fashion to that of a newsreader in a broadcast.

Meeting presenters:

  • Can customize the background image before starting the presentation
  • Can easily enable or disable the video feed during the presentation from the sharing bar


Timing

These new presentation features are rolling out now and will be available to users by mid September ’21 at the latest.